Building Elder Signs Cluster - Part 2
This is the third in the continued effort to turn six Odroid-MC1 Solos into a PXE booted computer cluster on which to engage in further FOSS hijinks. Previous post covered the steps involved in setting up the MicroSD cards to PXE boot the cluster nodes and mount root file system over NFS.
In this post, the plan is to install to convert the nodes from using NetworkManager to using Systemd-Networkd, install latest versions of Saltstack and using Salt push docker installs to all the cluster nodes.
Overview
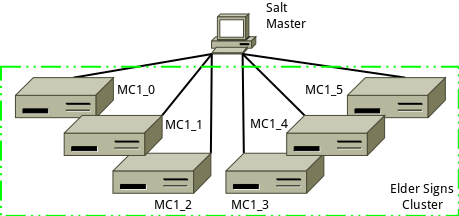
The Salt master machine already has Salt installed, and is where all state files will be created and pushed from. Initial install of the Salt minion software will take place on each of the cluster nodes. Once each minion is installed and communication with the master all subsequent changes will be pushed from the Salt master.
- Assumptions (Will need to be modified to the specifics of your environment)
- DNS allows Salt master to be looked up as salt
- IP address of Salt master is 192.168.1.96
- Salt minion ids for each of the cluster nodes are MC1_0, MC1_1, MC1_2,…, MC1_5
- Salt minion IP addresses are in the range 192.168.1.180-192.168.1.185
Installing Saltstack Minion Software
Salt-Minions on Ubuntu Armhf Devices
Much of the information and steps involved below were drawn from a previous post Notes on Upgrading Salt. As of the time of this writing the Ubuntu repository offers an older version of Salt and is still based on Python 2.7 which went out of support January 2020. As a result we will be bootstrapping and building Salt on each of the cluster nodes as below:
- On minion MC1_0 via ssh, remove existing salt minion with
sudo apt remove salt-minion salt-common -y - On minion, make bootstrap directory,
sudo mkdir -p /opt/projects/salt - Change to working directory,
cd /opt/projects/salt - Get bootstrap script with
sudo curl -o bootstrap-salt.sh -L https://bootstrap.saltstack.com - Bootstrap to desired version with
sudo sh bootstrap-salt.sh -r -x python3 -P git v2019.2 - Unmask service with
sudo systemctl unmask salt-minion - Enable service with
sudo systemctl enable salt-minion - On master remove old minion key with
sudo salt-key -d mc1_0 - On minion start service with
sudo systemctl start salt-minion - On master accept minion key with
sudo salt-key -a mc1_0 - On minion restart service with
sudo systemctl restart salt-minion - Run
sudo apt install libqmi-proxy libteamdctl0 iptables python3-dateutil libpcsclite1 python3-systemd iputils-arping libqmi-glib5 pptp-linux dnsmasq-base libip6tc0 libnm0 python3-psutil libndp0 libiptc0 libnfnetlink0 ppp dmidecode libnetfilter-conntrack3 libmm-glib0 libmbim-proxy usb-modeswitch-data python3-croniter python3-tz libpcap0.8 dns-root-data usb-modeswitch libjansson4 libbluetooth3 dctrl-tools libmbim-glib4to reapply needed files left orphaned by uninstalling previous salt-minion.
Repeat the steps above for each of the other 5 minions, MC1_1 to MC1_5.
Testing Salt Connectivity
After completing all the work, it’s important to test connectivity and make sure all the minions are running the same level of code.
$ sudo salt mc1_\* test.ping
mc1_2:
    True
mc1_5:
    True
mc1_1:
    True
mc1_4:
    True
mc1_3:
    True
mc1_0:
    True
$ sudo salt mc1_\* cmd.run 'salt-minion -V |grep Salt:'
mc1_5:
               Salt: 2019.2.0
mc1_3:
               Salt: 2019.2.0
mc1_4:
               Salt: 2019.2.0
mc1_2:
               Salt: 2019.2.0
mc1_1:
               Salt: 2019.2.0
mc1_0:
               Salt: 2019.2.0
Change from NetworkManager to Systemd-Networkd Using Salt
The Hardkernel provided minimal Ubuntu image I am using on the MC1 cluster nodes uses NetworkManager to provide network connectivity and I prefer to rely on systemd-networkd. From the list of active services below, I would like to get rid of NetworkManager.service, ModemManager.service and wpa_supplicant.service, and instead use systemd-networkd. wpa_supplicant.service while not strictly a NetworkManager service, does not need to be running unless it is being used to prove wireless connectivity. Since none of the cluster nodes are using wireless, there is no need for the service to be running, and so we will uninstall wpa_supplicant and NetworkManager entirely once we have systemd-networkd installed and working as desired.
Services Before Change
$ sudo salt mc1_1 cmd.run 'systemctl list-units --type=service --state=active'
mc1_1:
    UNIT                          LOAD   ACTIVE SUB     DESCRIPTION
    console-setup.service         loaded active exited  Set console font and keymap
    cpufrequtils.service          loaded active exited  LSB: set CPUFreq kernel parameters
    cron.service                  loaded active running Regular background program processing daemon
    dbus.service                  loaded active running D-Bus System Message Bus
    getty@tty1.service            loaded active running Getty on tty1
    keyboard-setup.service        loaded active exited  Set the console keyboard layout
    kmod-static-nodes.service     loaded active exited  Create list of required static device nodes for the current kernel
    loadcpufreq.service           loaded active exited  LSB: Load kernel modules needed to enable cpufreq scaling
    ModemManager.service          loaded active running Modem Manager
    networkd-dispatcher.service   loaded active running Dispatcher daemon for systemd-networkd
    NetworkManager.service        loaded active running Network Manager
    nfs-blkmap.service            loaded active running pNFS block layout mapping daemon
    odroid-tweaks.service         loaded active exited  ODROID Specific System Tweaks
    polkit.service                loaded active running Authorization Manager
    rc-local.service              loaded active exited  /etc/rc.local Compatibility
    resolvconf.service            loaded active exited  Nameserver information manager
    rpcbind.service               loaded active running RPC bind portmap service
    rsyslog.service               loaded active running System Logging Service
    salt-minion.service           loaded active running The Salt Minion
    serial-getty@ttySAC2.service  loaded active running Serial Getty on ttySAC2
    setvtrgb.service              loaded active exited  Set console scheme
    ssh.service                   loaded active running OpenBSD Secure Shell server
    systemd-journal-flush.service loaded active exited  Flush Journal to Persistent Storage
    systemd-journald.service      loaded active running Journal Service
    systemd-logind.service        loaded active running Login Service
    systemd-modules-load.service  loaded active exited  Load Kernel Modules
    systemd-random-seed.service   loaded active exited  Load/Save Random Seed
    systemd-remount-fs.service    loaded active exited  Remount Root and Kernel File Systems
    systemd-resolved.service      loaded active running Network Name Resolution
    systemd-sysctl.service        loaded active exited  Apply Kernel Variables
    systemd-timesyncd.service     loaded active running Network Time Synchronization
    systemd-udev-trigger.service  loaded active exited  udev Coldplug all Devices
    systemd-udevd.service         loaded active running udev Kernel Device Manager
    systemd-update-utmp.service   loaded active exited  Update UTMP about System Boot/Shutdown
    systemd-user-sessions.service loaded active exited  Permit User Sessions
    unattended-upgrades.service   loaded active running Unattended Upgrades Shutdown
    wpa_supplicant.service        loaded active running WPA supplicant

    LOAD   = Reflects whether the unit definition was properly loaded.
    ACTIVE = The high-level unit activation state, i.e. generalization of SUB.
    SUB    = The low-level unit activation state, values depend on unit type.

    37 loaded units listed. Pass --all to see loaded but inactive units, too.
    To show all installed unit files use 'systemctl list-unit-files'.
$
Stop and Mask NetworkManager
sudo systemctl stop NetworkManagersudo systemctl disable NetworkManagersudo systemctl mask NetworkManager
Enable and Start systemd-networkd
sudo systemctl unmask systemd-networkd.servicesudo systemctl enable systemd-networkd.servicesudo systemctl start systemd-networkd.service
Set Network Configuration with Netplan
- Create /etc/netplan/config.yaml with content as below, changing ip address as appropriate for each node.
network:
  version: 2
  renderer: networkd
  ethernets:
    eth0:
      addresses:
        - 192.168.1.181/24
      gateway4: 192.168.1.1
      nameservers:
addresses: [192.168.1.96, 1.1.1.1, 8.8.8.8]- Run
sudo netplan applyto apply changes - Reboot the node to make sure it works.
Uninstall Software
If node comes up properly after reboot, it is safe to remove unnecessary software.
- Run
sudo apt remove wpasupplicant network-manager modemmanager - Run
sudo apt autoremove
After Systemd-Networkd Switchover Completes
This is what things look like after the above, three previously running services are gone, and one new service is running, systemd-networkd.service.
 $ sudo salt mc1_1 cmd.run 'systemctl list-units --type=service --state=active'
mc1_1:
    UNIT                          LOAD   ACTIVE SUB     DESCRIPTION
    console-setup.service         loaded active exited  Set console font and keymap
    cpufrequtils.service          loaded active exited  LSB: set CPUFreq kernel parameters
    cron.service                  loaded active running Regular background program processing daemon
    dbus.service                  loaded active running D-Bus System Message Bus
    getty@tty1.service            loaded active running Getty on tty1
    keyboard-setup.service        loaded active exited  Set the console keyboard layout
    kmod-static-nodes.service     loaded active exited  Create list of required static device nodes for the current kernel
    loadcpufreq.service           loaded active exited  LSB: Load kernel modules needed to enable cpufreq scaling
    networkd-dispatcher.service   loaded active running Dispatcher daemon for systemd-networkd
    nfs-blkmap.service            loaded active running pNFS block layout mapping daemon
    odroid-tweaks.service         loaded active exited  ODROID Specific System Tweaks
    polkit.service                loaded active running Authorization Manager
    rc-local.service              loaded active exited  /etc/rc.local Compatibility
    resolvconf.service            loaded active exited  Nameserver information manager
    rpcbind.service               loaded active running RPC bind portmap service
    rsyslog.service               loaded active running System Logging Service
    salt-minion.service           loaded active running The Salt Minion
    serial-getty@ttySAC2.service  loaded active running Serial Getty on ttySAC2
    setvtrgb.service              loaded active exited  Set console scheme
    ssh.service                   loaded active running OpenBSD Secure Shell server
    systemd-journal-flush.service loaded active exited  Flush Journal to Persistent Storage
    systemd-journald.service      loaded active running Journal Service
    systemd-logind.service        loaded active running Login Service
    systemd-modules-load.service  loaded active exited  Load Kernel Modules
    systemd-networkd.service      loaded active running Network Service
    systemd-random-seed.service   loaded active exited  Load/Save Random Seed
    systemd-remount-fs.service    loaded active exited  Remount Root and Kernel File Systems
    systemd-resolved.service      loaded active running Network Name Resolution
    systemd-sysctl.service        loaded active exited  Apply Kernel Variables
    systemd-timesyncd.service     loaded active running Network Time Synchronization
    systemd-udev-trigger.service  loaded active exited  udev Coldplug all Devices
    systemd-udevd.service         loaded active running udev Kernel Device Manager
    systemd-update-utmp.service   loaded active exited  Update UTMP about System Boot/Shutdown
    systemd-user-sessions.service loaded active exited  Permit User Sessions
    unattended-upgrades.service   loaded active running Unattended Upgrades Shutdown
    user@1000.service             loaded active running User Manager for UID 1000

    LOAD   = Reflects whether the unit definition was properly loaded.
    ACTIVE = The high-level unit activation state, i.e. generalization of SUB.
    SUB    = The low-level unit activation state, values depend on unit type.

    36 loaded units listed. Pass --all to see loaded but inactive units, too.
    To show all installed unit files use 'systemctl list-unit-files'.
$
Installing Docker Community Edition Using Salt
The Ubuntu repository has a version of Docker which does not appear to work, or at least fails to install properly. As a result I wound up having to install Docker from the official repository, and even then the latest version failed to install, so I wound up going with an older version to at least get things running. If I manager to shift to the latest version, I will provide an updated post.
Install Dependencies
- Run
sudo apt-get install apt-transport-https ca-certificates curl software-properties-commonon each MC1 node. I will use Salt for this to do the installs across all nodes ate the same time.
$ sudo salt mc1_\* cmd.run 'sudo apt-get install apt-transport-https ca-certificates curl software-properties-common -y'
mc1_4:
    Reading package lists...
    Building dependency tree...
    Reading state information...
    ca-certificates is already the newest version (20180409).
    curl is already the newest version (7.58.0-2ubuntu3.8).
    software-properties-common is already the newest version (0.96.24.32.12).
    apt-transport-https is already the newest version (1.6.12).
    0 upgraded, 0 newly installed, 0 to remove and 0 not upgraded.
mc1_5:
    Reading package lists...
    Building dependency tree...
    Reading state information...
    ca-certificates is already the newest version (20180409).
    curl is already the newest version (7.58.0-2ubuntu3.8).
    software-properties-common is already the newest version (0.96.24.32.12).
    apt-transport-https is already the newest version (1.6.12).
    0 upgraded, 0 newly installed, 0 to remove and 0 not upgraded.
mc1_3:
    Reading package lists...
    Building dependency tree...
    Reading state information...
    ca-certificates is already the newest version (20180409).
    curl is already the newest version (7.58.0-2ubuntu3.8).
    software-properties-common is already the newest version (0.96.24.32.12).
    apt-transport-https is already the newest version (1.6.12).
    0 upgraded, 0 newly installed, 0 to remove and 0 not upgraded.
mc1_2:
    Reading package lists...
    Building dependency tree...
    Reading state information...
    ca-certificates is already the newest version (20180409).
    curl is already the newest version (7.58.0-2ubuntu3.8).
    software-properties-common is already the newest version (0.96.24.32.12).
    apt-transport-https is already the newest version (1.6.12).
    0 upgraded, 0 newly installed, 0 to remove and 0 not upgraded.
mc1_0:
    Reading package lists...
    Building dependency tree...
    Reading state information...
    ca-certificates is already the newest version (20180409).
    curl is already the newest version (7.58.0-2ubuntu3.8).
    software-properties-common is already the newest version (0.96.24.32.12).
    apt-transport-https is already the newest version (1.6.12).
    0 upgraded, 0 newly installed, 0 to remove and 1 not upgraded.
mc1_1:
    Reading package lists...
    Building dependency tree...
    Reading state information...
    ca-certificates is already the newest version (20180409).
    curl is already the newest version (7.58.0-2ubuntu3.8).
    software-properties-common is already the newest version (0.96.24.32.12).
    apt-transport-https is already the newest version (1.6.12).
    0 upgraded, 0 newly installed, 0 to remove and 0 not upgraded.
$- Add Docket GPG key by running
curl -fsSL https://download.docker.com/linux/ubuntu/gpg | sudo apt-key add -, Salt again.
$ sudo salt mc1_\* cmd.run 'curl -fsSL https://download.docker.com/linux/ubuntu/gpg | sudo apt-key add -'
mc1_5:
    Warning: apt-key output should not be parsed (stdout is not a terminal)
    OK
mc1_3:
    Warning: apt-key output should not be parsed (stdout is not a terminal)
    OK
mc1_4:
    Warning: apt-key output should not be parsed (stdout is not a terminal)
    OK
mc1_1:
    Warning: apt-key output should not be parsed (stdout is not a terminal)
    OK
mc1_0:
    Warning: apt-key output should not be parsed (stdout is not a terminal)
    OK
mc1_2:
    Warning: apt-key output should not be parsed (stdout is not a terminal)
    OK
$- Add Docker repository by running
sudo add-apt-repository "deb [arch=armhf] https://download.docker.com/linux/ubuntu $(lsb_release -cs) stable"on each node.
 $ sudo salt mc1_\* cmd.run 'sudo add-apt-repository "deb [arch=armhf] https://download.docker.com/linux/ubuntu  $(lsb_release -cs)  stable"'
mc1_4:
    Hit:1 http://ports.ubuntu.com/ubuntu-ports bionic InRelease
    Get:2 http://ports.ubuntu.com/ubuntu-ports bionic-updates InRelease [88.7 kB]
    Get:3 https://download.docker.com/linux/ubuntu bionic InRelease [64.4 kB]
    Get:4 http://deb.odroid.in/5422-s bionic InRelease [1721 B]
    Get:5 http://ports.ubuntu.com/ubuntu-ports bionic-backports InRelease [74.6 kB]
    Get:6 http://ports.ubuntu.com/ubuntu-ports bionic-security InRelease [88.7 kB]
    Get:7 https://download.docker.com/linux/ubuntu bionic/stable armhf Packages [10.2 kB]
    Fetched 328 kB in 9s (38.0 kB/s)
    Reading package lists...
mc1_3:
    Get:1 http://deb.odroid.in/5422-s bionic InRelease [1721 B]
    Hit:2 http://ports.ubuntu.com/ubuntu-ports bionic InRelease
    Get:3 http://ports.ubuntu.com/ubuntu-ports bionic-updates InRelease [88.7 kB]
    Get:4 https://download.docker.com/linux/ubuntu bionic InRelease [64.4 kB]
    Get:5 http://ports.ubuntu.com/ubuntu-ports bionic-backports InRelease [74.6 kB]
    Get:6 http://ports.ubuntu.com/ubuntu-ports bionic-security InRelease [88.7 kB]
    Get:7 https://download.docker.com/linux/ubuntu bionic/stable armhf Packages [10.2 kB]
    Fetched 328 kB in 9s (37.6 kB/s)
    Reading package lists...
mc1_5:
    Get:1 http://deb.odroid.in/5422-s bionic InRelease [1721 B]
    Hit:2 http://ports.ubuntu.com/ubuntu-ports bionic InRelease
    Get:3 http://ports.ubuntu.com/ubuntu-ports bionic-updates InRelease [88.7 kB]
    Get:4 https://download.docker.com/linux/ubuntu bionic InRelease [64.4 kB]
    Get:5 http://ports.ubuntu.com/ubuntu-ports bionic-backports InRelease [74.6 kB]
    Get:6 http://ports.ubuntu.com/ubuntu-ports bionic-security InRelease [88.7 kB]
    Get:7 https://download.docker.com/linux/ubuntu bionic/stable armhf Packages [10.2 kB]
    Fetched 328 kB in 12s (26.5 kB/s)
    Reading package lists...
mc1_1:
    Get:1 http://deb.odroid.in/5422-s bionic InRelease [1721 B]
    Hit:2 http://ports.ubuntu.com/ubuntu-ports bionic InRelease
    Get:3 https://download.docker.com/linux/ubuntu bionic InRelease [64.4 kB]
    Get:4 http://ports.ubuntu.com/ubuntu-ports bionic-updates InRelease [88.7 kB]
    Get:5 http://ports.ubuntu.com/ubuntu-ports bionic-backports InRelease [74.6 kB]
    Get:6 http://ports.ubuntu.com/ubuntu-ports bionic-security InRelease [88.7 kB]
    Get:7 https://download.docker.com/linux/ubuntu bionic/stable armhf Packages [10.2 kB]
    Fetched 328 kB in 32s (10.1 kB/s)
    Reading package lists...
mc1_2:
    Get:1 http://deb.odroid.in/5422-s bionic InRelease [1721 B]
    Hit:2 http://ports.ubuntu.com/ubuntu-ports bionic InRelease
    Get:3 https://download.docker.com/linux/ubuntu bionic InRelease [64.4 kB]
    Get:4 http://ports.ubuntu.com/ubuntu-ports bionic-updates InRelease [88.7 kB]
    Get:5 http://ports.ubuntu.com/ubuntu-ports bionic-backports InRelease [74.6 kB]
    Get:6 http://ports.ubuntu.com/ubuntu-ports bionic-security InRelease [88.7 kB]
    Get:7 https://download.docker.com/linux/ubuntu bionic/stable armhf Packages [10.2 kB]
    Fetched 328 kB in 33s (9849 B/s)
    Reading package lists...
mc1_0:
    Hit:1 https://download.docker.com/linux/ubuntu bionic InRelease
    Hit:2 http://ports.ubuntu.com/ubuntu-ports bionic InRelease
    Get:3 http://ports.ubuntu.com/ubuntu-ports bionic-updates InRelease [88.7 kB]
    Get:4 http://deb.odroid.in/5422-s bionic InRelease [1721 B]
    Get:5 http://ports.ubuntu.com/ubuntu-ports bionic-backports InRelease [74.6 kB]
    Get:6 http://ports.ubuntu.com/ubuntu-ports bionic-security InRelease [88.7 kB]
    Fetched 254 kB in 34s (7424 B/s)
    Reading package lists...
$- Install specific version of docker using
sudo apt-get install docker-ce=5:18.09.9~3-0~ubuntu-bionic docker-ce-cli=5:18.09.9~3-0~ubuntu-bionicon each node then hold the version so it does not get automatically upgraded.
$ sudo salt mc1_\* cmd.run 'sudo apt-get install docker-ce=5:18.09.9~3-0~ubuntu-bionic docker-ce-cli=5:18.09.9~3-0~ubuntu-bionic -y'
mc1_4:
    Reading package lists...
    Building dependency tree...
    Reading state information...
    docker-ce-cli is already the newest version (5:18.09.9~3-0~ubuntu-bionic).
    docker-ce is already the newest version (5:18.09.9~3-0~ubuntu-bionic).
    0 upgraded, 0 newly installed, 0 to remove and 0 not upgraded.
mc1_1:
    Reading package lists...
    Building dependency tree...
    Reading state information...
    docker-ce-cli is already the newest version (5:18.09.9~3-0~ubuntu-bionic).
    docker-ce is already the newest version (5:18.09.9~3-0~ubuntu-bionic).
    0 upgraded, 0 newly installed, 0 to remove and 0 not upgraded.
mc1_3:
    Reading package lists...
    Building dependency tree...
    Reading state information...
    docker-ce-cli is already the newest version (5:18.09.9~3-0~ubuntu-bionic).
    docker-ce is already the newest version (5:18.09.9~3-0~ubuntu-bionic).
    0 upgraded, 0 newly installed, 0 to remove and 0 not upgraded.
mc1_5:
    Reading package lists...
    Building dependency tree...
    Reading state information...
    docker-ce-cli is already the newest version (5:18.09.9~3-0~ubuntu-bionic).
    docker-ce is already the newest version (5:18.09.9~3-0~ubuntu-bionic).
    0 upgraded, 0 newly installed, 0 to remove and 0 not upgraded.
mc1_2:
    Reading package lists...
    Building dependency tree...
    Reading state information...
    docker-ce-cli is already the newest version (5:18.09.9~3-0~ubuntu-bionic).
    docker-ce is already the newest version (5:18.09.9~3-0~ubuntu-bionic).
    0 upgraded, 0 newly installed, 0 to remove and 0 not upgraded.
mc1_0:
    Reading package lists...
    Building dependency tree...
    Reading state information...
    docker-ce-cli is already the newest version (5:18.09.9~3-0~ubuntu-bionic).
    docker-ce-cli set to manually installed.
    docker-ce is already the newest version (5:18.09.9~3-0~ubuntu-bionic).
    0 upgraded, 0 newly installed, 0 to remove and 0 not upgraded.
$- Test that docker works using
sudo docker run hello-worldon each node.
$ sudo salt mc1_\* cmd.run 'sudo docker run hello-world'
...
mc1_4:
    Unable to find image 'hello-world:latest' locally
    latest: Pulling from library/hello-world
    4ee5c797bcd7: Pulling fs layer
    4ee5c797bcd7: Verifying Checksum
    4ee5c797bcd7: Download complete
    4ee5c797bcd7: Pull complete
    Digest: sha256:9572f7cdcee8591948c2963463447a53466950b3fc15a247fcad1917ca215a2f
    Status: Downloaded newer image for hello-world:latest

    Hello from Docker!
    This message shows that your installation appears to be working correctly.

    To generate this message, Docker took the following steps:
     1. The Docker client contacted the Docker daemon.
     2. The Docker daemon pulled the "hello-world" image from the Docker Hub.
        (arm32v7)
     3. The Docker daemon created a new container from that image which runs the
        executable that produces the output you are currently reading.
     4. The Docker daemon streamed that output to the Docker client, which sent it
        to your terminal.

    To try something more ambitious, you can run an Ubuntu container with:
     $ docker run -it ubuntu bash

    Share images, automate workflows, and more with a free Docker ID:
     https://hub.docker.com/

    For more examples and ideas, visit:
     https://docs.docker.com/get-started/
$
Next Steps
- Set up docker swarm and test functionality
- Setup backups
- Build state files to handle all the configuration via Salt
However enough for this post.

Chrls is currently a technology transformation leader at one of the oldest American investment banking services holding companies, headquartered in New York City. Previous roles at current employer include project manager, front office support, retail and enterprise global Windows server support. Currently residing in Tennessee on the Cumberland Plateau and enjoying life, family and open source.
Mastodon Funkwhale